Download
Download the latest release to somewhere convenient on your computer (wherever you usually build/compile/work on your mods).
You can also get the latest version from Nexus Mods if you prefer.
Video Walkthrough
If reading is really not your thing, you can see a video walkthrough of using ACMI to pack a mod below.
ACMI (Installer)
Introduction
ACMI is a simple command-line app that will automatically generate the XML files required for mod installers (like Vortex) to show a nice guided installer rather than users having to pick the right mod files on their own.
Including these files will simplify installing mod packs when using compatible mod installers, showing users which files will affect which aircraft and which slot and interactively prompting them for which files to install. As of 0.3.1, ACMI supports aircraft skins, radio portraits, weapon skins, crosshairs, canopies, cockpits and visual effects.
Installation and Usage
If your mods are in your current directory, just run acmi.exe build to build the installer files, or you can pass a specific directory like acmi.exe build D:/Mods/MyAwesomeSkinPack if it’s not in the current directory. You can also just drag-and-drop your mod folder onto the acmi.exe file (see the Walkthrough below) to immediately build installer files for that directory.
If it completes successfully, you should see a new fomod directory in your mod files. Just include that folder when you ZIP up your archive (to upload to Nexus/ModDB/wherever) then anyone who installs your archive with a mod manager will get the nice guided installer. Users who want to install manually can just ignore the fomod folder and it will not affect your other files in any way.
acmi.exe --help to see some basic help and usage infoExtras/Advanced
Images
We’ll try our best to find a suitable image for the installer as a whole. This will be shown on the first page of the installer and for any steps without their own images. If there’s only one .png/.jpg in the root folder, we’ll use that. If there’s more than one, we’ll use the first one we find with “preview” in the name.
You can also have images for your individual skin files! Just include a .png or .jpg with the same name as the .pak file, beside it. For example, for a file at Skins\UntoldGalmPack_F15C_F15ACipher1994_MageSlot.pak, we would check for a Skins\UntoldGalmPack_F15C_F15ACipher1994_MageSlot.png file and use that if it’s found.
Alternatively if your pak files are in separate folders (organised by slot or set, for example) the installer will also check if there’s only one image in the same folder as your skin files and use that. If this causes problems for your structure, please raise an issue and I’ll try and come up with a better solution.
Multi-Skin Files
If your mod directory includes .pak files with more than one skin in them (such as merged NPC files), include the exact string MULTI anywhere in the file name. This tells ACMI to scan a much larger chunk of the file to find skins and include any it finds, not just the first one.
For example, F15SMTD_Monarch_Skin1_P.pak will only get scanned for one, but Flashy_NPC_Aircraft_MULTI_P.pak would get scanned for any skins and included in a separate step of the final installer. This should work with any pak file up to about 2.5GB, but let me know if it doesn’t work.
Special Files
There’s a couple of things you can also do to tweak how ACMI picks up your files and includes them in an installer.
Lightweight Packing
If the mod has been packed using Cherry’s “lightweight” packing method, the individual slot files will have nothing but an instance file in them so ACMI won’t detect them as a “real” skin file. If you include (LIGHT) or (LW) somewhere in the file name, ACMI will instead detect those instance files and sort them into planes and slots correctly.
Likewise, if you add (REQ) or (REQD) in your “base package” file, it should be identified as a required file and users will not be able to toggle the file off during installation.
FAQ
Here are some of the Frequently Asked Questions about ACMI.
Who is ACMI for?
Modders. More specifically, it’s for whoever is packing mod archives. Before you actually ZIP up the mod files, just run acmi build, answer the prompts, and the files will be generated for you (in their own fomod folder).
Why should I use this?
I get it. You’ve got a workflow that works for you and don’t want to learn a new thing. That’s why ACMI is designed to be as easy-to-use as possible!
In my opinion, there’s two good reasons why: drastically better user experience and less bug reports. For the thousands of Vortex users with Ace Combat, installing mods without installers is pretty unintuitive. Installing mods with ACMI files is trivial and doesn’t require an innate understanding of how modding works. It’s really a whole different level of easy to install, for everything from simple skin mods to complex packs.
The advantage for you is less reports. When a Vortex user installs your mod without any installers, the default action will almost certainly not install correctly. Users will have to take a wild guess at which files they need, which is where problems can arise. With ACMI files, the installer handles all of that for them and shows a convenient wizard that avoids the installation errors you might otherwise get.
How does it work?
The short version is that ACMI will scan through the mod root (defaults to the current directory) and find any .pak files then check for the actual object path in the file headers (something like /Game/f15c_06_D) and use that to guess what aircraft and slot it’s for. Next, we build a big list of all the skins in all the files, group them by aircraft and skin slot and then build the XML that mod installers will use to provide choices to the user.
What file types does it support?
At current, ACMI will fully detect and specifically handle skins, radio portraits, weapons, crosshairs, cockpits, canopies and visual effects. Any PAK files that can’t be detected properly will still be included in the installer files in a separate “Extra Files” step.
What happens to my lovingly crafted README files?
If you have any README files that you want to be installed, make sure they’re in the root of the mod files, not in a folder of their own. If you do that, no matter what choices someone makes in the installer, your README file will still be installed with all its veiled threats and shitpost-y lore details
Will it affect other users?
In short, no. When a user goes to install your mod manually, they’ll unzip the archive and the only impact is that there will be an extra fomod folder in the unpacked files. There’s only two XML files in there, so it won’t even break things if users accidentally “install” that folder, so it shouldn’t cause any impact for users.
Does it affect my mod files?
No. We don’t make any changes to the .pak files the ACMI finds (I wouldn’t even know how), and instead we just read some strings out of the file headers to determine aircraft, skin, etc
Walkthrough
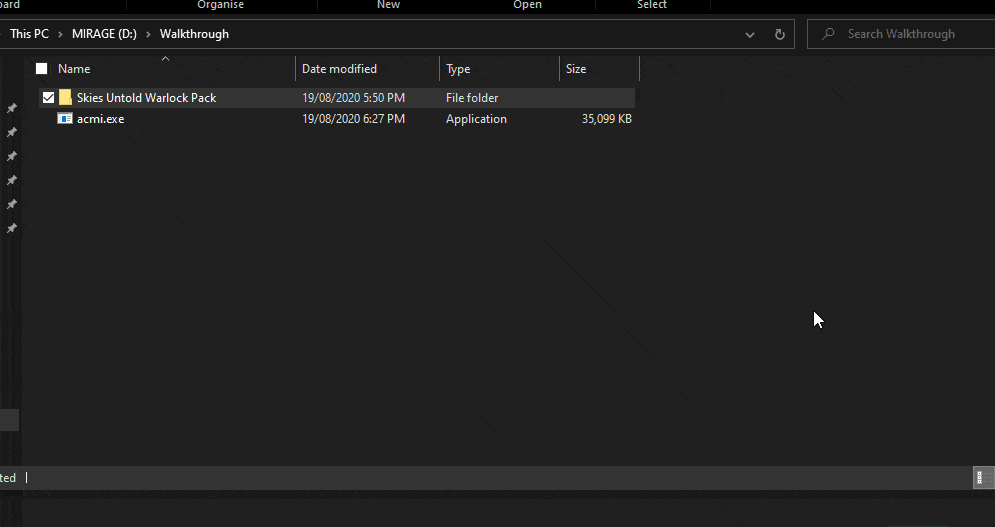
For an example of how to use this, we’re going to build installer files for a chonker of a skin pack: the excellent Skies Untold Historic Warlock Pack by njmksr.
Getting Started
First, we’re going to assume you’ve unpacked the acmi.exe to somewhere convenient. In our example, that’s going to be D:/Mods, the same folder where our mod packs are installed:
D:\Mods
├── Skies Untold Warlock Pack
│   ├── readme.txt
│   └── Skins
│       ├── Warlock 1959
│       │   ├── UntoldWarlockPack_F104C_Warlock616_SpareSlot_P.pak
│       │   └── UntoldWarlockPack_F104C_Warlock742_MageSlot_P.pak
│       ...trimmed...
│       └── Warlock Heritage
│           ├── UntoldWarlockPack_F15E_HeritagePaint_StriderSlot_P.pak
│           ├── UntoldWarlockPack_YF23_HuxianHeritageF4E_StriderSlot_P.pak
│           └── UntoldWarlockPack_YF23_WisemanHeritageP51_SpareSlot_P.pak
├── Mobius Skin with Gold Nozzles or whatever
│   └── ... your other files...
└── acmi.exe
Running the tool
Now it’s just a case of running ACMI and telling it where your mod files are:
D:\Mods> .\acmi.exe build '.\Skies Untold Warlock Pack\'
Or to make it easier, just drag your folder on to the .exe file you unpacked:
Now, you can just package up your mod files like you usually would (or use ./acmi.exe zip to quickly have it done for you)

When a user installs that ZIP file with a supported mod installer (Vortex in this example), they’ll see a proper wizard stepping them through aircraft and slot choices:
ACMI (Packer)
Introduction
ACMI Packer (aka acmi-pack) is a simple command-line app that will semi-automatically pack your cooked asset files into pak files ready for distribution (remember to run ACMI before you zip up your final package). Unlike existing solutions, ACMI Packer attempts to cut down on the manual work in packing and particularly doesn’t usually need folders to be set up correctly.
ACMI Packer is a highly-opinionated tool. To boil that down, it means this will not be the tool for every possible packing scenario and has no intentions to be. ACMI Packer is primarily intended for skin mods and other UI mods and might struggle with more complex stuff.
What’s the ACMI connection?
ACMI Packer is pretty much impossible to fully separate from ACMI itself as it uses the same underlying logic to read and identify AC7 mod files. Whereas ACMI reads the files from inside a pak file, ACMI Packer can just read it straight from the cooked files on disk.
This also means that ACMI Packer works best with any of the file types that ACMI supports. As of 0.3.1, that’s aircraft skins, radio portraits, weapon skins, crosshairs, cockpits, and canopies.
Usage
In short, the easiest way to build your PAK files is to drag-and-drop the folder containing all your cooked files onto acmi-pack.exe.
Preparing your cooked files
Once you have your cooked files (should be a set of files like fa27_05_D.uasset and so forth), drop them into an empty folder.
- Aircraft skin files (including diffuses, instance files and MREC files) can simply be left as-is, they don’t need to be put into their own folder structure.
- Same for weapon skins, cockpits and canopies: just dump them wherever
- Other supported file types (i.e. portraits, emblems, and crosshairs) should be put in a folder but don’t need the whole folder structure, just the actual folder they end up in.
- For example, radio portraits just need to be in a folder called
SubtitleSpeakerPortraitand emblems just need to go in a folder calledEmblemetc etc
- For example, radio portraits just need to be in a folder called
- Any files that ACMI doesn’t support, you’ll need to recreate the full “Nimbus/…” structure for, but they’ll still be packed.
Running the build
Now drag the folder you set up onto acmi-pack.exe and you should get some questions to walk you through the process.
You’ll have the option to group certain files together into a single PAK file. If you don’t want to do this, just hit ENTER when prompted to skip it. Grouping can be useful for doing things like packing all your HUD elements into a single PAK file, or rolling all your NPC skins into one file.
Once you’ve completed the prompts (and chosen the output format) you will see a short summary of the files that were created and you can check your assets folder to find your new pak files.
acmi-pack.exe --help to see some basic help and usage infoRequired Paths
The advantage to using ACMI’s detection logic is that you often won’t need to recreate the whole Nimbus/... folder structure to pack your files: it will do that automatically. However, because PA can’t name shit to save their lives, some file types still need at least some of the path to be recreated to pack properly.
| Type | Top Directory | Example Path |
|---|---|---|
| Skins | N/A | ./fa44_04_D.uasset |
| Canopies | N/A | ./f15c_Canopy1_Inst.uasset |
| Weapons | N/A | w_lacm_f0_D.uasset |
| Cockpits | N/A | asfx_CP_D.uasset |
| Ships* | N/A* | ./aegs_D.uasset |
| Radio Portraits | SubtitleSpeakerPortrait | ./SubtitleSpeakerPortrai/40_Scream.uasset |
| Emblems | Emblem | Emblem/png/emblem_022_m.uasset |
| Crosshairs | HUD | ./HUD/MultiLockon/hud_Multi_Lock-on_Air-to-Air_Missile_04.uasset |
| VFX | VFX | VFX/Common/Materials/AfterBurner/M_AfterBurner_Glow_01.uasset |
- Support for ship skins is highly untested and only supports textures right now
Anything that isn’t in the list above will need the full Nimbus/Content/... structure in the folder you’re building from to end up in the right place, but it will still be packed.
Advanced
Alternative Files
Since ACMI Packer doesn’t need to set up the full folder structure, it’s a bit easier to do variations of the same files.
Walkthrough: Skins
Let’s take the example of two variants of a skin for the same slot: an XFA-27 skin in Slot 7. When you cooked your files, you will have produced some files that you can copy into a folder like this:
C:/Mods/XFASkin
├── Standard Version
│   ├── fa27_06_D.uasset
│   ├── fa27_06_D.uexp
│   ├── fa27_06_MREC.uasset
│   └── fa27_06_MREC.uexp
Easy enough, right? Now cook your alternate version and put them in their own folder:
C:/Mods/XFASkin
├── Standard Version
│   ├── fa27_06_D.uasset
│   ├── fa27_06_D.uexp
│   ├── fa27_06_MREC.uasset
│   └── fa27_06_MREC.uexp
├── Alternate Skin
│   ├── fa27_06_D.uasset
│   ├── fa27_06_D.uexp
│   ├── fa27_06_MREC.uasset
│   └── fa27_06_MREC.uexp
Now to build the paks for your standard version, just drag the Standard Version directory to acmi-pack.exe. Then, to pack your alternate skins, drag the Alternate Skin directory onto acmi-pack.exe. You’ll get the relevant pak files put into each folder and if you give the alternate version a different name when prompted, that will appear in the pak file names too!
Normals and MRECs
When ACMI Packer starts packing your files, it will actually read any Instance files (aka *_Inst.uasset) it finds and automatically determine the paths for MRECs and Normal files. ACMI Packer will set up any extra paths (like the ex/ folder) for you depending on what the Instance file uses: just make sure the cooked asset is named right.
That means that in general, you can just dump all your cooked files and any relevant instance files in the same folder, like so:
C:/Mods/A10Skin
├── a10a_00_D.uasset
├── a10a_00_D.uexp
├── a10a_00_Inst.uasset
├── a10a_00_Inst.uexp
├── a10a_00_MREC.uasset
├── a10a_00_MREC.uexp
├── a10a_00_N.uasset
└── a10a_00_N.uexp
…and when ACMI runs, it will open and read a10a_00_Inst.uasset and determine the correct place for the MREC and N files in the final PAK file.
If you have the Instance file, you can also open it with the ACMI Packer to quickly check what paths it uses. Note that the instance reader will show you the paths that the instance file uses even if it’s a vanilla game file. For example, instances without separated Normals will still show a path/filename for Normals, it will just be a vanilla game file.
Recooking Assets
If you’ve already cooked your skin’s assets for one slot, ACMI can “recook” your files for different slots without having to duplicate and cook them all in UE4.
Once you have all your cooked assets for one slot, you should have files like the below:
C:/Mods/XFASkin
├── fa27_00_D.uasset
├── fa27_00_D.uexp
├── fa27_00_Inst.uasset
├── fa27_00_Inst.uexp
├── fa27_00_MREC.uasset
└── fa27_00_MREC.uexp
Next, you must put any instance files for slots you want to use in the folder as well. Otherwise ACMI might recook MRECs or Normals with the wrong file paths.
Next, grab the source assets (i.e the cooked assets you want to copy to other slots) and drop them all onto acmi-pack.exe. If ACMI parses your cooked assets correctly, it will prompt you to select what slots you want to “recook” for, so you might enter 03,04,05 to repack for the Mage/Spare/Strider slots.
ACMI will then create copies of the cooked assets but modified to use whichever slot(s) you entered. As long as you put your instance files in the folder as well, it will even read the instance files and use the correct names for any MRECs or Normals it recooks.
You can then grab the folder and drop it onto acmi-pack.exe to immediately pack your newly “recooked” assets.
Unsupported Files
While ACMI Packer works best with skins and other ACMI-supported files (like radio portraits or canopies), it should still work just fine for other mods as well. Just create the full Nimbus/Content/.../... folder structure for your cooked file like you usually would and run the packer. It should identify the files in their folder and recreate the folder structure from the build folder in the resulting PAK file.
Changelog
This is a brief summary only of major changes in each version.
- 0.4.3
- Update name mappings for CAS DLC aircraft.
- 0.4.2
- Fix packed skin files getting generic names instead of skin names.
- 0.4.1
- Fix startup errors with ACMI Installer
- Catch possible error in app info command
- 0.4.0
- No more Python required! ACMI now uses an internal packer so it no longer depends on either
u4pakorUnrealPak. This should speed up packing and make setting up easier. - Support for drop tanks that use their own textures (i.e. F-15E and MTD)
- Improved detection of both aircraft skins and vessels
- Highly experimental support for recooking skin assets into new slots
- No more Python required! ACMI now uses an internal packer so it no longer depends on either
- 0.3.9
- Major under-the-covers rework to file detection and handling: please report any new issues you find
- Fixes to properly support
Decal_Instfiles - Update with name mappings for (hypothetical) TG DLC aircraft.
- 0.3.8
- Update with name mappings for EAS DLC aircraft.
- Take note that the casing for some new files (especially the MTD) is very inconsistent.
- 0.3.7
- Now uses a slightly older-than-current version of u4pak to avoid a bug in the latest release.
- This means that the first time you run this version, it will probably re-download
u4pak. This is expected.
- 0.3.6
- Fix bug in weapon packing: instances and textures will now be in the right paths
- 0.3.5
- Add new instance reader command
- Drag an Instance file to
acmi-pack.exeto quickly check what paths the file expects
- Drag an Instance file to
- Add new instance reader command
- 0.3.4
- Major improvements to detections
- Should support more of the weird MREC paths
- Fixes vessel and weapon path matching
- Improve logging and build scripts
- Probably some other stuff I’ve forgotten about
- Major improvements to detections
- 0.3.3
- Completely rework build runner logic
- Now supports falling back to
UnrealPak.exewhen Python isn’t installed - Now has very limited support for lightweight/instance-based files
- 0.3.2
- Completely rework Python detection.
- Improve detection for a few file types.
- Massive thanks to @BlackBaron1945 for helping out with testing the changes in this release!
- 0.3.1
- Quick panic update to fix an incorrect path in canopies…
- …also adds support for cockpit mods
- …and improves how the installer is generated
- 0.3.0
- Introduces ACMI Packer: a semi-automatic packer for mod assets
- Add zipping of mod files to end of installer creation
- Better installers for mods with one-skin-per-slot
- Added support for VFX mods
- Heaps more I can’t think of…
- 0.2.6
- Update with name mappings for OAS DLC aircraft
- Now requires a path, showing an error if one isn’t given.
- 0.2.5
- Minor improvements to canopy detection, including PA’s insane inconsistencies
- 0.2.4
- Improved image support to cut down on duplicate images
- Dramatically improved multi-skin file support
- You should now be able to safely MULTI any file up to 2.5GB without taking hours to build
- 0.2.3
- Basic support for emblem detection (mostly untested!)
- Improved app info commands and performance
- XML files will now include metadata comments
- 0.2.2
- A whole bunch of improvements to canopy detection. Thanks Cherry!
- Minor performance improvements (100+ file packages should now take around ~5s)
- Other minor fixes and improvements
- 0.2.1
- Updated to support canopy files
- Will now add missing file name suffix if required
- Improved XML generation (under the covers)
- 0.2.0
- Major update to add support for new object types: portraits, crosshairs, visual effects and weapons
- Improvements to skin detection to handle more files
- Overall performance and stability improvements
- Significantly better console output
- 0.1.1
- Improvements to skin detection
- Early support for multi-skin PAK files
- Changed the input prompts
- 0.1.0
- Initial release
Support
This is just a community-backed open-source project, not an officially-supported modding tool. As such, support is best-effort.
To report a problem or request a new feature, create a new issue on the GitHub repository and provide as much detail as possible. You can usually find me on the Ace Combat Discord as well (👋 #ac-modding).